3D Realization Summary Post: Semester 2
May 3, 2017
Developing 3D Skills
Real World Object
Low Poly Modelling
Texturing
Improved Props
Portraits
Creating A Shop
the task of this project is to create a shop front for a building that would feature in the town centre. This building is based on the real world being realistic and common. It is to be 3d Modelled for use in a video game engine as part of a shoot ’em up game.
Since the buildings in this project are going to be in a town centre there are certain buildings which fit and certain ones that don’t. Food shops are a big part of a town centre as this is usually a place for social gathering. Therefore my pitch for this project is to create a bakery. The building will be semi-attached feature a side alley that acts as access leading to the apartment above the shop. This can be used in the game as a resource area or as a way to access the roof. The current plan is to have a garden roof, meaning that it will be flat, surrounded by railings and contain furniture and homely decoration.This would act as a good vantage point in the game that allows the players to get a bird’s eye view of the map. The player does not reach the roof using the apartment however it is still reachable via a fire exit ladder placed on the side of the building.
The shop front itself will technically be on the first floor rather than the ground as a downstairs storage room will be accessible from the outside via steps that lead downwards. This then means that the entrance to the shop will be small steps that bridge over the top of the downstairs. To make this clear that it is a bakery it will contain the typical feature of a canopy which will be out during the day. Just above that would then be the sign displaying the name of the shop to recreate the realism.
The appearance of the shop changes depending on whether it is day or night. When it is the day the shop is open with the canopy out and the products such as pastry and cakes can be seen on stands through the window. At night time, however, this appearance completely changes as the shop is shut. Since it is bakery it is likely that the shop would not be open on a night time. To show the canopy is now folded away and the window is no longer visible as a metal grate is pulled down and locked over it, adding security. The apartment above now comes to life, the windows are wide open with lights flashing on and off and lots of noise echoing out. The sign of the bakery is now hanging from one hinge revealing the name of a gambling club located on the floor above. To make sure apparent that it is an illegal gambling club certain indications will be visible such as cards and money will be stickers plastered on the windows.
If this building were to be used in a game it could be done in several ways. The bakery could act as a place where the player can regain health or possibly by more food for further adventures. The club above would act as a mission that the player can only access at night, where they have to infiltrate and shut it down.
To help with this project I went out looking for unique buildings that could possibly bring something to my building. This included possibly window designs, roof designs, and canopy designs. As well as this I also looked at buildings that had the design which I decided in my pitch.


I created initial sketches of my building that allowed me to possibly look at different varieties of the design. This was mainly to help me come up with a design for the side entrance in the alley as I wasn’t sure how it was going to work. It also allowed me to combine some of the ideas that I had from my research into my drawings.
")
")

Before taking my design any further I wanted to create a ‘photo bash’ in photoshop. This way I could see if the different designs elements actually worked together. When doing this I found that there were some tweaks I had to make to my design such as the alley entrance as there was no space for the ladder that leads to the roof.

Before modelling my building I decided to go into SketchUp and create a quick mockup of my building. This way I could visualise what the final outcome would look like and what I feel needed to change. After doing this I could tell that the rooftop access didn’t fit in as it was too bulky and looked out of place. Therefore now the only way to reach the building will be via the ladder down the alley.

To make sure that the building was the correct scale I looked up what the minimum height must be from a floor to a ceiling. This helped me create the three stories of my building. As well as this I found out the average size of a brick and a door so that I was able to create the width of the building that looked in the correct proportion. Since the maximum width limit was 7m I decided that my building would be 5 metres, this way I would have plenty of space for the door, its frame and the large window looking into the shop.


With my measurements I had found for my door I was able to create the basic shape of my building. I added all of the details for my building simply using the bevel and extrude tools as this allowed me to create the trims and roof of my building. For things such as the canopy and the windows, I did them as separate objects so that they would be easier to edit later on. I added a little detail to the side of the building as its only purpose was to allow access for the player to reach the roof, therefore I simply added a ladder onto the side, as well as a train pipe which went all around the building. The overall building turned out really well and looked similar to my original drawings and my photo bash. The final poly count was 5000 with this building and the reason for that is the railings. Since the railing contained lots of cylinders it had a high poly count, even though they had a few sides. Without the railings, the final poly count only came to 1500. To make sure my window would be transparent I also made sure that I cut out a full behind them using the slice tool, this way the inside of the building could be visible. However, since I wasn’t doing an inside to the building I decided to place a small box around the inside of the window. Therefore the non-existent back of the building could not be seen. For this project, I decided just to model the daytime version of the building as it contains the most detail and would allow me to add texture to the windows.


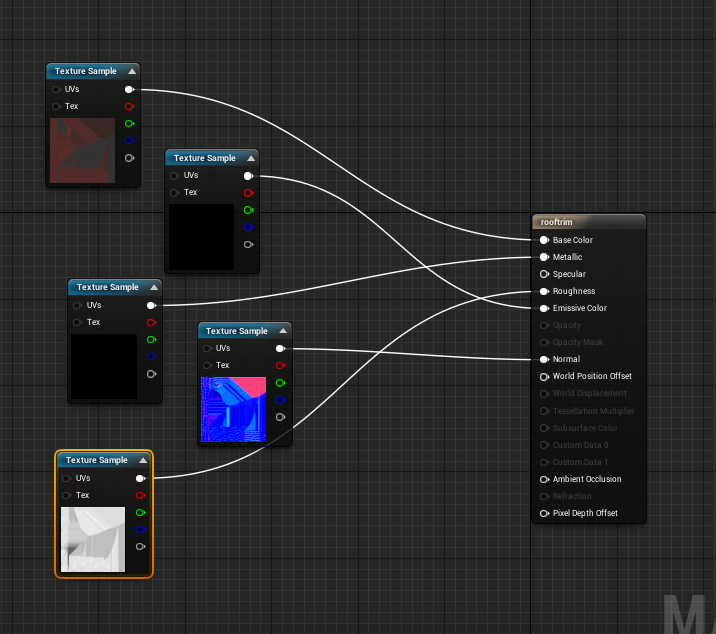
This was my first large-scale attempt at texturing and also my first time using substance painter. At first, I found it extremely hard as I didn’t understand what I was doing. However, after seeking the help of my fellow group mates I now have basic knowledge of the program. When texturing I tried to show a good contrast between certain parts of the building so that it was broken up and added more depth. A good example of this is the window frames. I decided to do this in a dark brown wood texture to add separation into the wall. I also did the door and frame a completely different colour so that the door is clearly visible. When in substance painter I made sure that I exported my material as a PBR, giving multiple layers including roughness, metallic, and emissive. I separated each component of the building and UV mapped them separately as this was easier for texturing. I then brought the textured versions all back together in a single 3ds max file so that it could be imported into Unreal Engine. I didn’t texture the windows as this is something my fellow student would help me to create when in Unreal Engine.


Here are all the base colour maps for all the different textures that I used for this building.


Before texturing I imported my model into Unreal to make sure that it was the correct scale. at first, I found that my player was nearly 4x the size of the building and clearly that was wrong. I found that the problem was when exporting the model as an FBX in 3DS Max I had to change the units to match those which I worked in. This worked and my building was the correct scale.

After importing my textured building into Unreal I was able to add the other PBR maps to the different components as they were set as different material ID’s. This was fairly easy to do and made a huge difference to the final outcome.


In unreal the whole group imported the FBX of their buildings so that we could create the final street for this project. To help with the layout I decided to create a road in 3ds max as this would allow us to easily figure out what buildings were meant to go where. It also filled out the gaps between the buildings. The centre of the road appeared empty so I decided to add a railing in using the options available in 3ds max. This forced the player to run on the path instead of cutting across the middle. Even tho my building was textured I imported my untextured version into the street as I felt like it looked odd being the only building that was textured.


Overall I am happy with the outcome of this project especially since it was my first time texturing a larger scale model. This project allowed me to experiment with new programs such as substance painter and unreal engine and grasp a basic understanding of how they work together. In my previous attempts at texturing I have simply done the entire model as one UV map however by separating the individual components like I did with this project, I found it much easier to keep track of what part was what in the UV map. It also made it simpler when actually texturing in Substance painter as there was no chance of the texture spilling into another part of the model.
